Soap Cutting

Soap drying rack

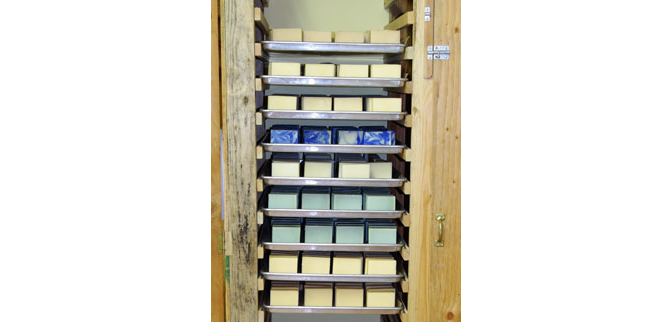
Yesterday was the day for cutting soap. I made 8 batches several days ago and they’ve been wrapped in their blankets, patiently waiting to be cut. Now in the drying rack (see picture above) I have pumpkin spice, peach, swirled unscented, lovespell, sandalwood & amber and kumquat. Sort of an eclectic mix!

I do so like having soaps in the drying rack! We created the soap rack by building a small closet with sidebars spaced so they hold up trays of soap. Just to the right there is another closet like the one shown (you can see the handle in the photo). I have a marine dehumidifier in there which helps evaporate the water out of the soap more quickly, making the dried soaps salable in 2-3 weeks instead of 6-8 weeks.

Click the link to learn more about the soap making process.

300 years of Natural Soap and Cosmetic Recipes cover

If you want inspiration for developing unique natural soap and cosmetics formulations of your own, or are intrigued by how things were done “back in the day,” get my book!

Comments

7 responses to “Soap Cutting”

  1. just stumbled on your site – and am very happy I did. Marine dehumidifier – what a brilliant little tip. Made my (new) soap making life so much more interesting. I hate waiting 6 weeks – it kiils me. 🙂 Thanks for showing us your racks as well.

  2. Jamie: the drying racks are made as you see in the picture. We built a “closet” with bars on the sides to support standard-sized baker’s trays. The soap goes on the trays and they slide in on the bars on the sides. At the bottom is a marine dehumidifier that has a hose to drain the water to the outside of the building.

    Julie: I’ve done the pre-measuring several ways. When I wrote this article, I measured oils for each batch into separate containers and put lids on them. The lye water was measured out and put in heavy-duty plastic pour pitchers. Then when it was time to make a batch, I melted the oils for one batch, mixed and poured.

    Since that time I’ve changed my system a little. Now I measure enough oils for 8 batches and melt it all together in a 10 gallon stainless steel container. It is actually a beer keg with the top cut out and a spigot installed for making beer. (Purchased it on ebay). It fits on a turkey-fryer propane burner. I measure the lye for each batch separately into pitchers. Since the combination of oils will be the same for each batch, I know exactly how much lye is needed.

    Then when I make soap, I measure out the oil for one batch from the total mixed and melted oils. Put that in my 5 gallon mixing bucket, add lye, and mix. That way I can add the scent/color to each batch individually.

  3. I would love to know if you have the specs or plans on how you built the drying rack and if you would be willing to share this information with me thanks.

    Jamie

  4. Hi Marie,
    I read with interest your process for making soap. In particular the pre-measure of oils and lye for the 20 or so batches. Are you able to explain this in more detail? I’m only doing one batch at a time, and would love to cut back some time and have prepared multiple batches. I do measure out my oils the day (or so) before, I don’t melt the hard oils until I am about to make soap, I just mix up the liquid ones and put aside until I am ready, and some times I mix up the lye and put in a safe place. Do you melt all your hard oils and add to liquid and THEN take out your oil quantity when you make a batch? If yes, how would you know if your oils are mixed properly to match the lye calculation? I just love your web page, the photo of the barn and your horse looks so beautiful and peaceful.
    Happy soaping,
    Julie

  5. Marie,

    I really love your cring set up. Would you please explain how to make it (the closet with marine dehumidifier) I would like to use it for my soap factory.

    Thanks for your kindness and looking forward to hear from you very soon.

  6. Marie Gale

    Thanks!

    It is pretty efficient. It’s nice not having to wait for 5 – 6 weeks (sometimes more in rainy Oregon)!

  7. Marie, I love the soap curing setup you have. It looks very efficient.

Leave a Reply

Your email address will not be published. Required fields are marked *